Takes high-quality video and photos even in low-light situations
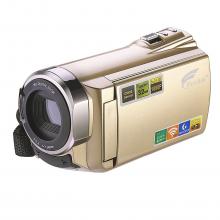
Set Up and Use
- Install the battery and SD card
- Open the viewing screen to the left of the battery to turn the camcorder on
- Change settings using the MENU button on the left side of the camcorder
- The camcorder automatically enters video mode. You can switch to photos or audio using the MODE button on the top of the camcorder
- Use the PHOTO button on the top of the camcorder to take pictures and the START/STOP button to begin/end video or audio recording
Getting the Photos/Video off of the Camera
- Press the PLAY button on the left side of the camcorder to review photos and video
- Use the USB cable provided with the camera and connect it to a computer. The camera also has WiFi and can be accessed using the “iSmart DV” App (via Google Play).
- Find the camera in the File Explorer. Photos and videos will be saved under the folder DCIM\100MEDIA.
- Copy your pictures and movies over to a flash drive or cloud storage space.
Loan Period:
3 days
You can check this out from:
1st floor Circulation Desk
Lost/Damaged Equipment Fee:
$188.00